The Master Boot Record:
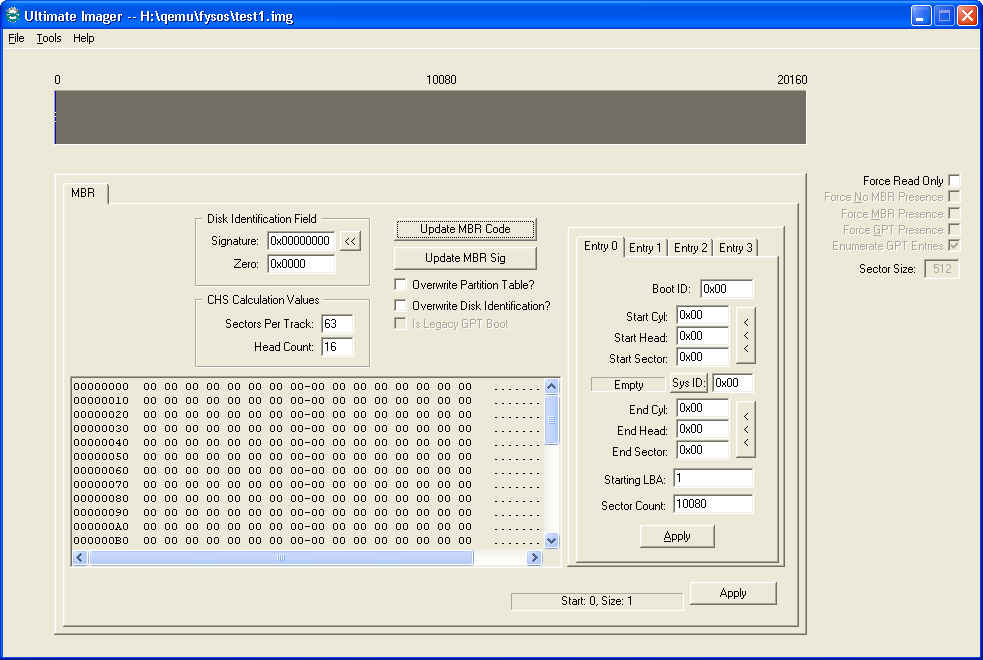
Disk Identification Field:
Signature: A 32-bit signature. The button just to the right of this field will create a random signature.
Zero: This 16-bit field should be zero.
These two fields are used in modern Operating Systems as a marker, or a signature to mark this MBR with a unique signature.
CHS Calculation Fields:
These two fields are used when calculating the CHS fields in the Entries to the right.
Update MBR Code
This button will allow you to choose a file to write to the code portion of this LBA (LBA 0). The two check boxes below it indicate whether the new file overwrites the two respected areas.
The code can now be more than 512 bytes in length. For example, if you are modifying the Legacy MBR code for a GPT partitioned image, you can use all of the first 512 bytes of the first sector, and if the Is Legacy GPT Boot check box is checked, you can use the 420 bytes after the GPT Header in the second sector, as well as any further consecutive sectors you need. However, note that your GPT Entries must start at an offset after all of this code.
I currently use a two-sector Legacy GPT Boot code which uses the bytes before the Partition Table in the first sector as well as the 420 bytes after the GPT Header in the second sector. This makes the Entries start at the "normal" place of LBA 2. However, the New Image function now allows you to set this past LBA 2.
As long as your code leaves room for the MBR Partition Table *and* for the GPT Header, you can update the code using this tool as long as there is a GPT tab *and* the Is Legacy GPT Boot checkbox is checked.
Update MBR Sig
This button will simply update the 16-bit word at offset 510 to 0xAA55 (55 AA).
Entry #
Each of the at most four tabs will contain a MBR Partition Entry. You must fill each field to create a valid entry. You may use the button to the right of the CHS fields to have the app calculate these fields. If so, it will use the two values in the SPT and Head Count fields to the left.
You may click on the "Sys ID:" button to choose a known ID value or simply type one in to the field to the right of the button.
Please note: This app will not parse an entry if the Sys ID field is zero.
Please note: You must click on the "Update" button within each tab to save the changes made in each entry. (You do not have to use the main Apply button to make the entry changes stick)
The box in the lower left is a hex dump of the first sector of the disk.
Apply:
This button makes any changes made, not counting the entries, to the file. For example, if you updated the code, made changes to the signature values, or other changes, you must use this Apply button to make those changes to the image file. The entries have an Apply button for each entry and will apply the changes to that tabs changes itself.