Ultimate: The Ultimate Image Browser: Modify new MBR image
Now that you have a new MBR image, what do you do with it?
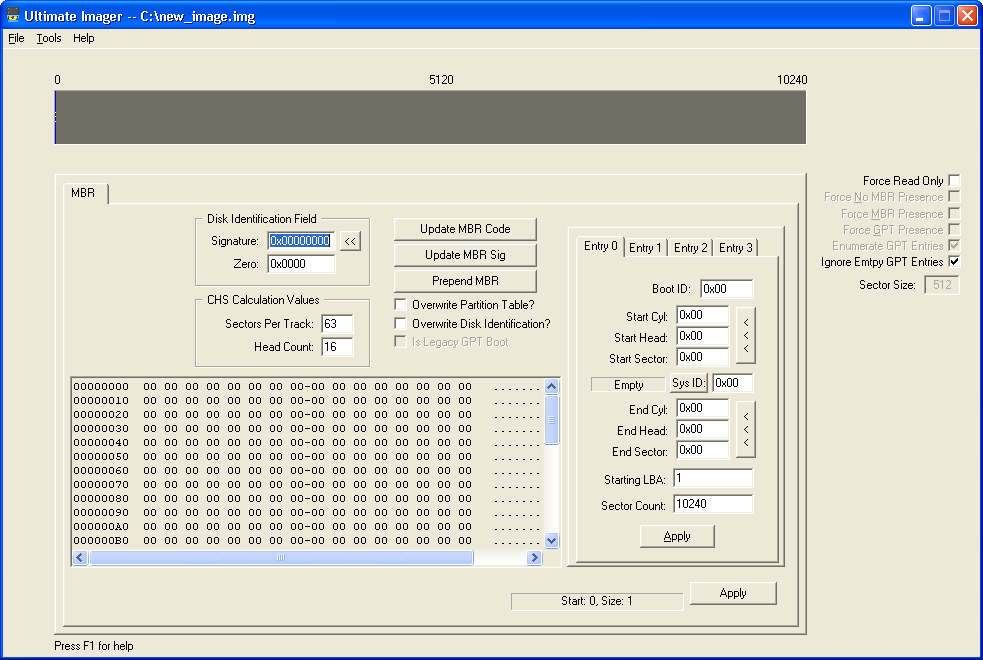
Once you open the new image, you should have a dialog that looks similiar to:

- Some systems like to have a 32-bit disk signature at offset 0x1B8.
- Click on the '<<' button next to the Signature field to give it a random signature value.
- These same systems like to have the 16-bit value at offset 0x1BC zero.
- If this value is not zero, you may enter a value of 0x0000 here.
- The values in the "CHS Calculation Values" are used when calculating the CHS values in each entry.
- See below where these values are used.
- The large box underneath is simply to show the values in this sector
- The Update MBR Code button allows you to update the MBR code.
- Clicking on the button will ask for a file name.
- Choose a 512-byte file that contains valid MBR code.
- This will not overwrite any partition entry, the signature, or the zero field, unless the associated checkbox(es) are checked.
- You do not have to click on the APPLY button to update the MBR code.
- The large dump box should now be updated to show the new contents.
- The Update MBR Sig button simply ensures that the value at 0x1FE is 0xAA55.
- Clicking on the button will write this value to this address.
- The Prepend MBR button inserts sectors before the image.
- On a rare occasion (I needed to once), you might wish to prepend empty sectors to the image file.
- This function will ask how many sectors to prepend and then prepend sectors to the image file.
- The Overwrite Partition Table checkbox will allow the new MBR code (using the Update MBR Code button) to overwrite the existing Table.
- The Overwrite Disk Identification checkbox will allow the new MBR code (using the Update MBR Code button) to overwrite the existing Signature and Zero fields.
- The Is Legacy GPT Boot checkbox will allow the new MBR code (using the Update MBR Code button) to overwrite the existing GPT Header.
- If the utility found a GPT at LBA 1, and the MBR code you are writing to LBA 0 (using the Update MBR Code button) is more than one sector, this will allow the existing GPT Header to be over written by the new code.
- If this checkbox is cleared, only the first sector will be overwritten.
Partition Entries
- Boot ID:
- The Boot ID field should be 0x00 or 0x80 but allows you to put any 8-bit value.
- Start CHS fields:
- These are the starting CHS fields for the associated partition.
- You may put any 8-bit value in either field.
- If you click on the button to the right, the utility will place the correct values from the Starting LBA field below.
- Sys ID:
- The Sys ID field is the Partition Type field.
- You may put any 8-bit value in this field.
- You may click on the Sys ID: button to choose a type.
- The description box just to the left should update to a type as you enter a value.
- Note that Ultimate will not see any partitions until the Sys ID field for that partition is non-zero.
- End CHS fields:
- These are the ending CHS fields for the associated partition.
- You may put any 8-bit value in either field.
- If you click on the button to the right, the utility will place the correct values from the Starting LBA and Sector Count fields below.
- Starting LBA
- This is the 32-bit LBA value of the first sector in the partition.
- Please note that if you modify this value, the utility will not "move" the partition for you. It only modifies this value.
- Sector Count
- This is the 32-bit sector count of sectors in the partition.
Applying your changes
- Any changes to any partition entry must have that entry's Apply button used or the change will not be written to the image.
- Note that if an entry is modified, there will be a star '*' next to the entry name on the tab control.
- Note that clicking on the Apply button only updates the entry, it doesn't actually write it to disk. See next item entry.
- Note that most items are not actually written to disk until you click on the Apply button in the lower right corner.
- The Update MBR Code does not need the Apply clicked.
- A few other items do not need the Apply clicked.
- However, if you are not sure, simply click the Apply button anyway, to ensure that the sector is written to disk.
Complete
Now that you have updated the items mentioned above, you should have a valid partitioned image.
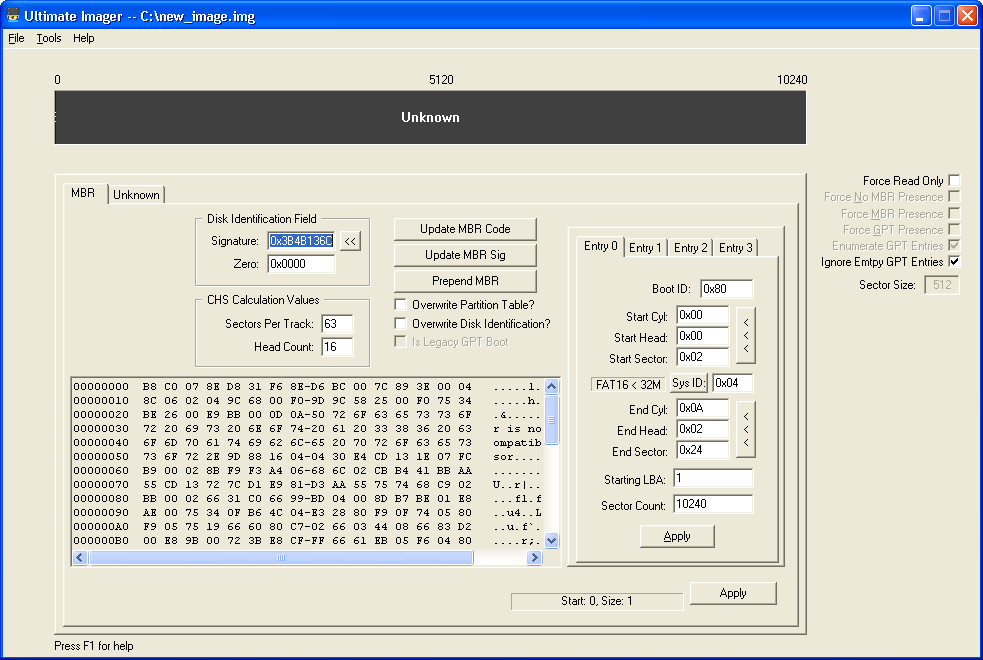
In this example, I did the following:
- updated the MBR code using the Update MBR Code button.
- Give it a signature using the Signature button.
- Marked the first partition as bootable (0x80 in the Boot ID field).
- Updated the Starting and Ending CHS values using the two respected buttons.
- Chose the FAT 16 (less than 32 Meg in size) partition type id.
- Clicked the Partition Entry's Apply button.
- Clicked the main tab's Apply button.
- I then reloaded the image using the File->Reload menu option.
Here is an updated view of the image. Notice everything has been updated as well as there is now an Unknown Tab.

FAT 16 partition format
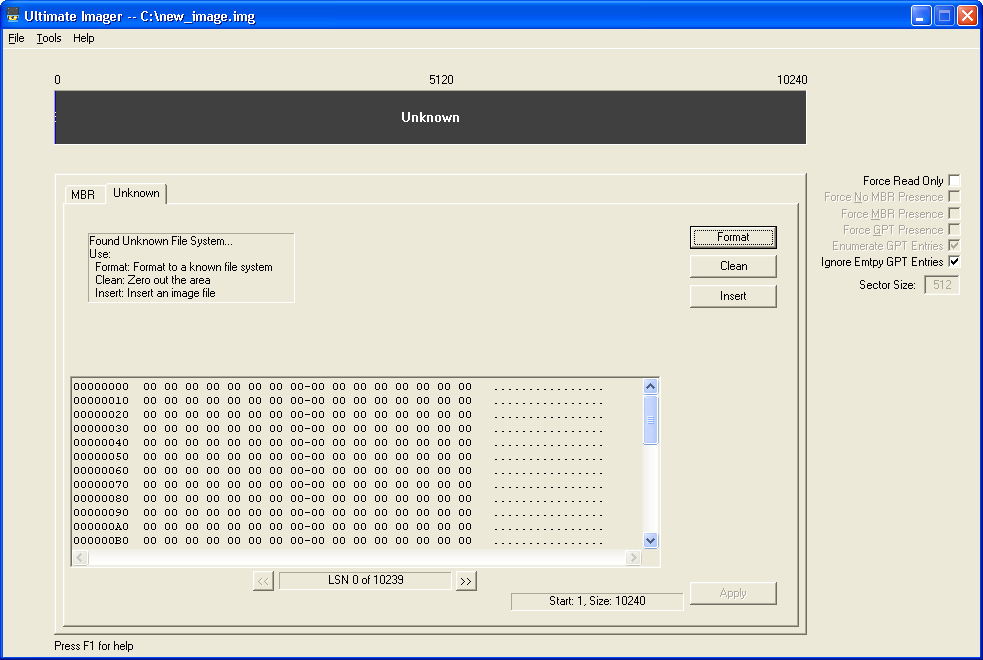
Clicking on the Unknown tab now shows the empty partition contents.

Since we chose the FAT 16 type, let's choose to format this partition to that format.
Please note that this utility does NOT use the MBR Partition Entry's ID to indicate what file system is on the partition. Each partition is individually inspected and detected.
- Click on the Format button and choose FAT 16.
- Now you will be asked for a file.
- This is the file to use for the boot code for this format.
- It can be more than one sector in size.
- This file's contents will be placed at the first sector of this partition.
- If you wish to skip this step, simply click the Cancel button.
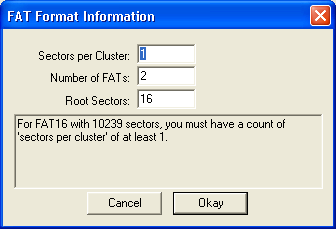
- A dialog will appear asking for some information about the format.

- This will populate with some default values for the format you have chosen.
- You may choose other values.
- If there were no errors, the utility should indicate that the format has been completed.
- The dump window will now be updated to the first sector of the partition.
- Use the File->Reload menu option to reload the image.
You should now have an empty FAT 16 partition ready for files.
See FAT help for more information.


